In the world of front end development there is no better tool than Lighthouse. Lighthouse is an open-source, automated tool for improving the quality of web pages. You can run it against any web page, public or requiring authentication. It has audits for performance, accessibility, progressive web apps, SEO and more.

Report generated by lighthouse

The only problem with lighthouse, at least from my experience, is that it is not used until after the app has been deployed. I haven’t been involved in any project that utilizes lighthouse upfront, certainly not on the ci/cd pipelines. Which can be done using lighthouse-ci. There is also another way to get lighthouse running on your ci/cd pipeline, it involves executing lighthouse while you are running your unit test regardless of the unit test engine, be that Jest or Mocha. However, these tools lack the ability to invoke a web browser, after all, lighthouse can only be run against an actual website.

This is where Playwright comes into play. For those that don’t know, playwright is the new kid on the block, it is a tool that enables end to end testing. Playwright is able to invoke a headless browser session, could be chrome, firefox, or webkit, then using that headless session we can run lighthouse thus giving us the ability to run lighthouse on a unit test. The idea came from this blog post by applitools where they combine lighthouse with cypress and Pa11y to do performance testing.

To get started I am going to start a new project using the following npm command.

1
npm init

Followed by this npm install command to get all dependencies installed.

1
npm install --save-dev jest playwright lighthouse typescript ts-jest ts-node @types/jest @types/lighthouse @babel/preset-typescript

Here is the package.json file generated so far using the above npm commands.

 1
 2
 3
 4
 5
 6
 7
 8
 9
10
11
12
13
14
15
16
17
18
19
20
21
22
23
24
25
26
27
28
29
30
31
32
{
  "name": "lighthouse-ci-playwright",
  "version": "1.0.0",
  "description": "A sample project on how to use lighthouse along with playwright",
  "main": "index.js",
  "scripts": {
    "test": "jest"
  },
  "repository": {
    "type": "git",
    "url": "https://github.com/circleupx/lighthouse-ci-example-with-playwright"
  },
  "keywords": [
    "playwright",
    "lighthouse"
  ],
  "author": "CircleUpX",
  "license": "MIT",
  "devDependencies": {
    "@babel/preset-typescript": "^7.13.0",
    "@types/jest": "^26.0.23",
    "jest": "^27.0.4",
    "jest-junit": "^12.1.0",
    "lighthouse": "^8.0.0",
    "playwright": "^1.11.1"
  },
  "dependencies": {
    "ts-jest": "^27.0.3",
    "ts-node": "^10.0.0",
    "typescript": "^4.3.2"
  }
}

Next, I’ll configure jest using the following jest.config.ts file.

 1
 2
 3
 4
 5
 6
 7
 8
 9
10
11
12
export default {
  preset: 'ts-jest',
  testEnvironment: 'node',
  testMatch: ['<rootDir>/**/test/*.ts'],
  testPathIgnorePatterns: ['/node_modules/'],
  coverageDirectory: './coverage',
  coveragePathIgnorePatterns: ['node_modules', 'src/database', 'src/test', 'src/types'],
  reporters: ['default', 'jest-junit'],
  globals: { 'ts-jest': { diagnostics: false } },
  transform: {},
  testTimeout : 20000
};

and I will use the following setting to configure babel. This is required to get jest to play nicely with typescript, see using typescript for more information.

1
2
3
export const presets = [
    '@babel/preset-typescript',
];

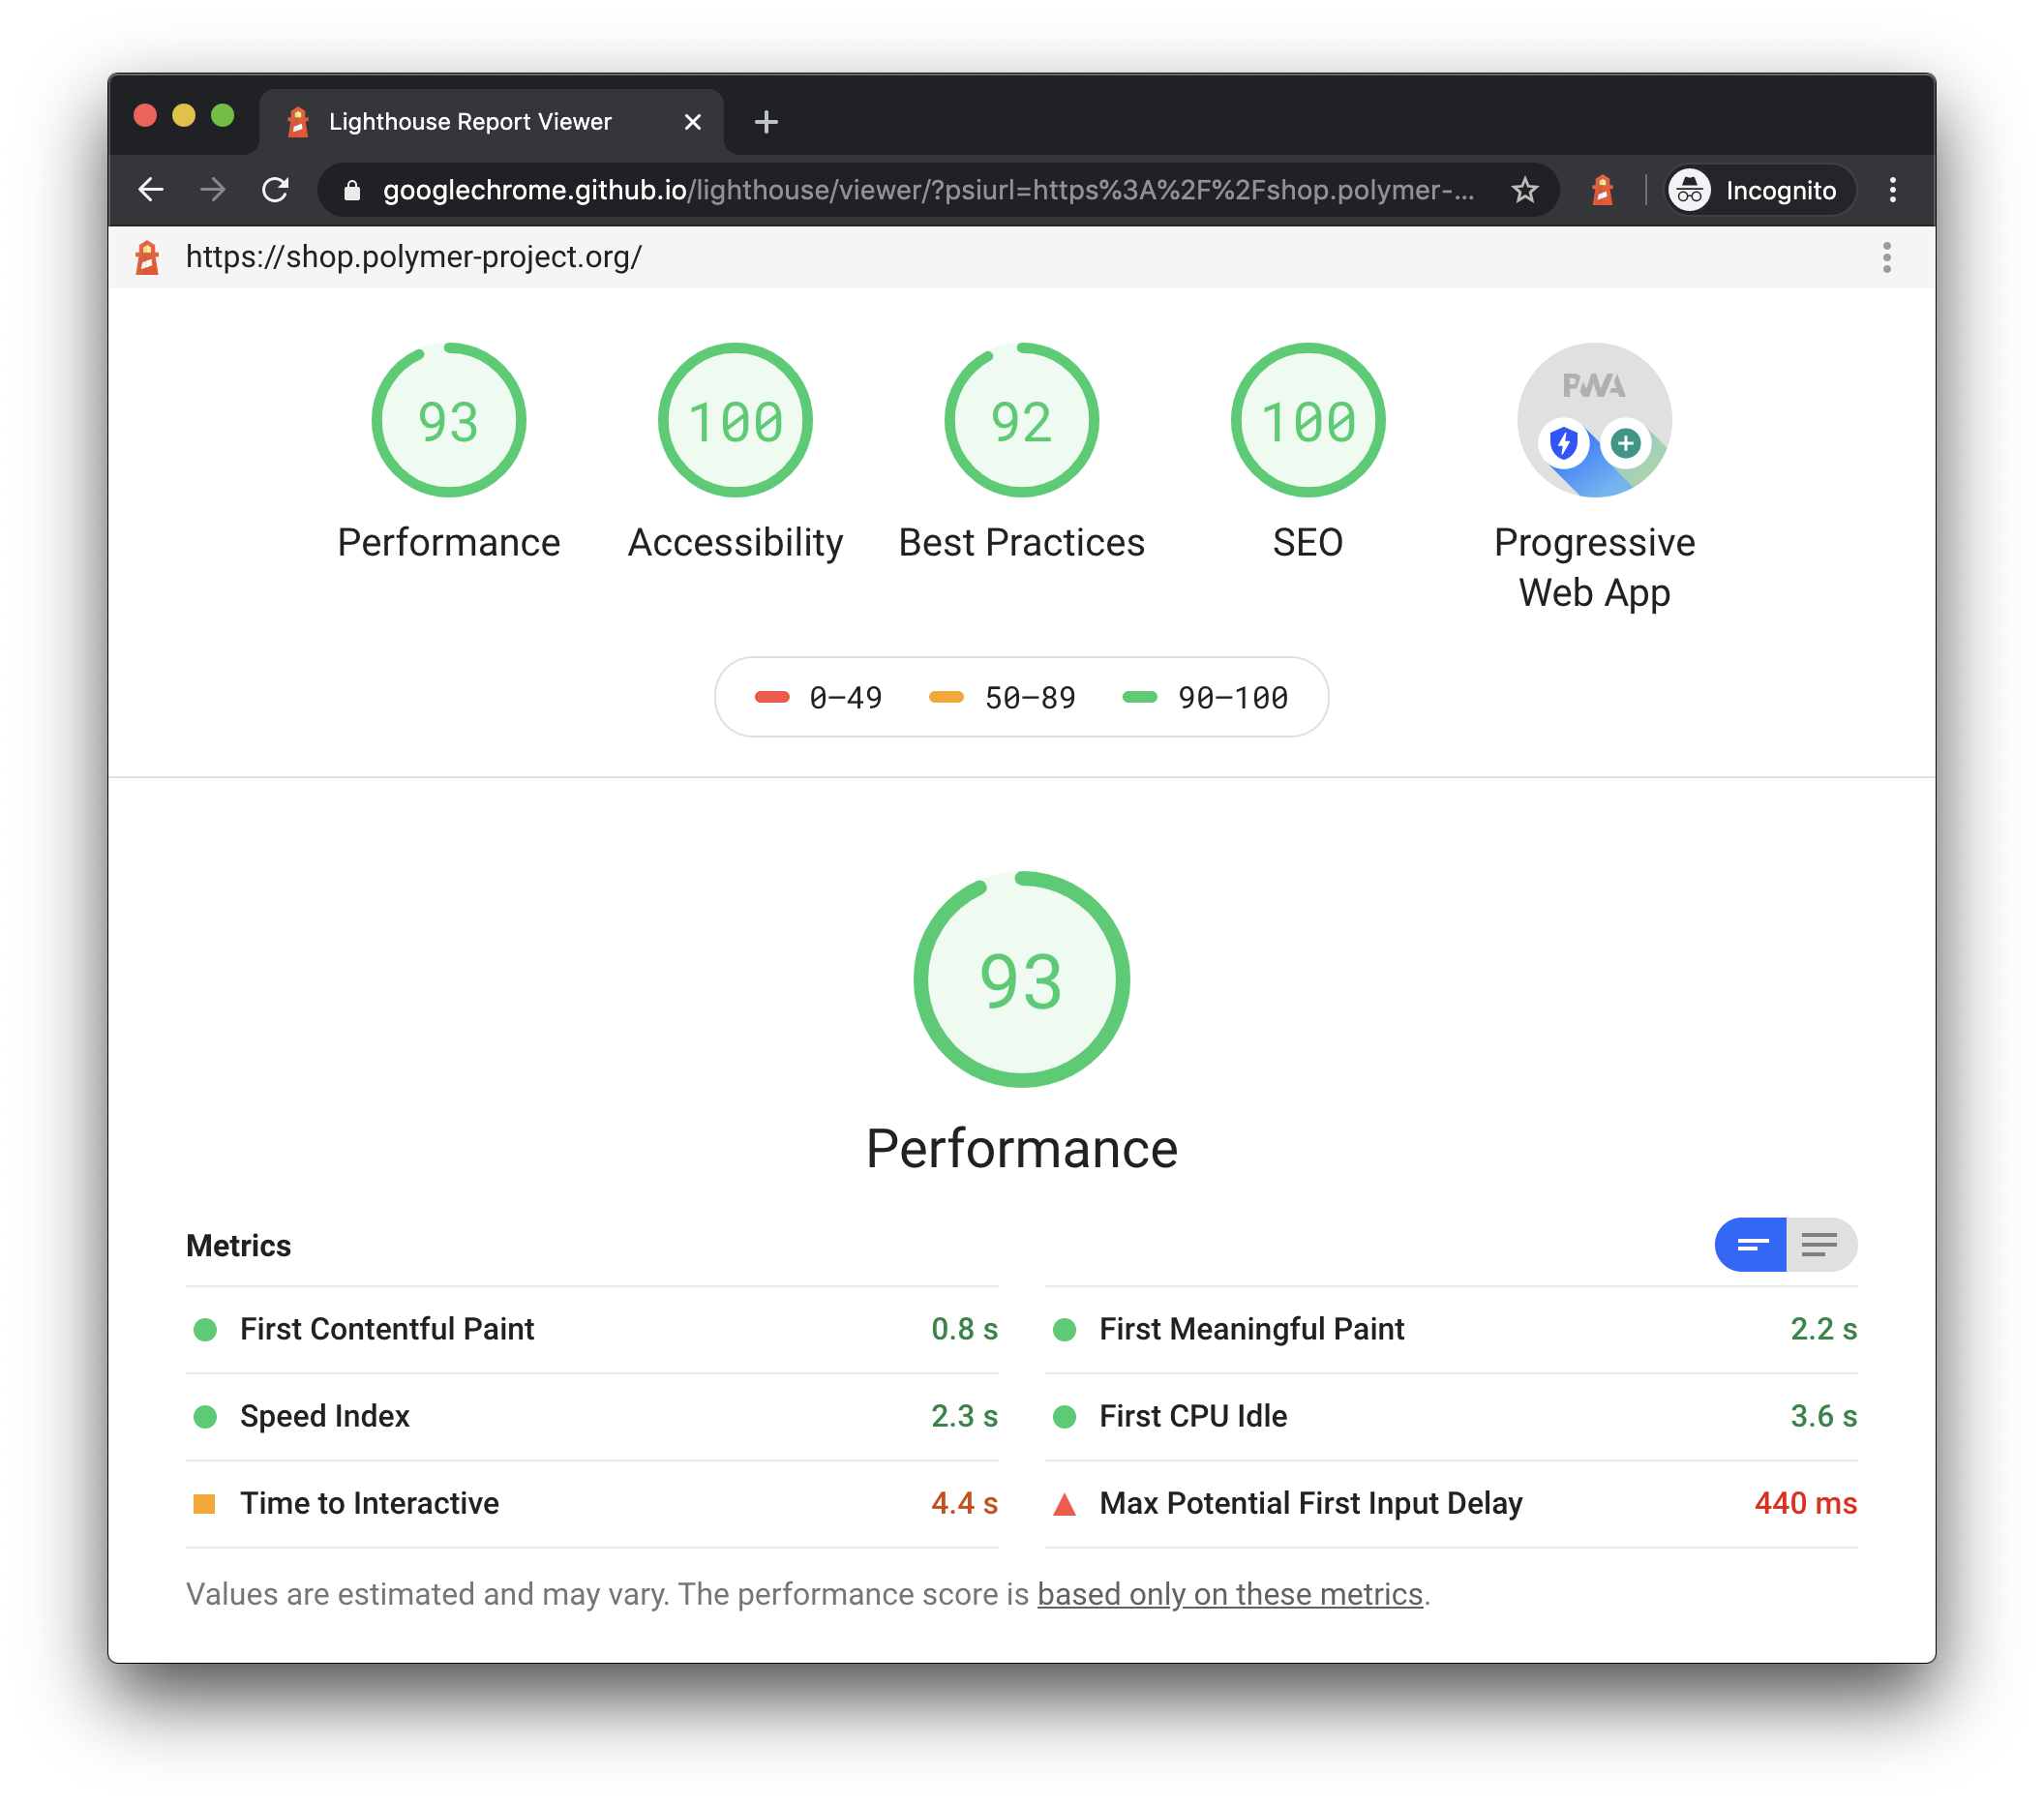
Everything has been configured, I am ready to write my first test. I’ll add a new ’test’ folder to host all the unit test file. I am going to use https://shop.polymer-project.org/ as my test site, this is full feature e-commerce Progressive Web App demo site. The test will fire up playwright, it will visit the demo site, then lighthouse will be invoked, it will perform an analysis on the site’s performance. Lastly, I will assert that the site’s performance is greater than or equal to 80.

I’ll add a new file under the test folder, I will name it lighthouse.ts. The first thing I need to do is to import the required dependencies.

1
2
import { Browser, chromium, Page } from 'playwright';
import lh = require('lighthouse');

Next, I’ll configure beforeAll, beforeEach, afterAll and afterEach. This methods are responsible for constructing and tearing down playwright.

 1
 2
 3
 4
 5
 6
 7
 8
 9
10
11
12
13
14
15
16
17
let browser: Browser;
beforeAll(async () => {
    browser = await chromium.launch({ headless: false, args: [`--remote-debugging-port=8041`] });
});

afterAll(async () => {
    await browser.close();
});

let page: Page;
beforeEach(async () => {
    page = await browser.newPage();
});

afterEach(async () => {
    await page.close();
});

Do notice the args parameter passed the launch method, it includes a debugging port, make a note of the port number, you will need it later on. The flag –remote-debugging-port will allow the lighthouse instance of chrome to connect to the playwright instance of chrome. Feels like a hack, but this works. The code below represents the unit test.

1
2
3
4
5
6
7
8
describe('Load shop.polymer-project.org home page', function () {
    it('should have a page performance greater than or equal to 90', async () => {
        const options = { logLevel: 'info', output: 'html', onlyCategories: ['performance'], port: 8041 };
        const runnerResult = await lh('https://shop.polymer-project.org/', options);
        console.log('Performance score was', runnerResult.lhr.categories.performance.score * 100);
        expect(runnerResult.lhr.categories.performance.score * 100).toBeGreaterThanOrEqual(80);
    });
});

As you can see the test itself is rather simple. Some lighthouse options are set, notice the port number is the same port number used on the remote flag. The only category that will be tested will be performance. The log level and output type are set. By the way, the output could be set to json. Here is the entire test file.

 1
 2
 3
 4
 5
 6
 7
 8
 9
10
11
12
13
14
15
16
17
18
19
20
21
22
23
24
25
26
27
28
29
30
import { Browser, chromium, Page } from 'playwright';
import lh = require('lighthouse');

let browser: Browser;
beforeAll(async () => {
    browser = await chromium.launch({ headless: false, args: [`--remote-debugging-port=8041`] });
});

afterAll(async () => {
    await browser.close();
});

let page: Page;
beforeEach(async () => {
    page = await browser.newPage();
});

afterEach(async () => {
    await page.close();
});

describe('Load shop.polymer-project.org home page', function () {
    it('should have a page performance greater than or equal to 80', async () => {
        const options = { logLevel: 'info', output: 'html', onlyCategories: ['performance'], port: 8041 };
        const runnerResult = await lh('https://shop.polymer-project.org/', options);
        console.log('Performance score was', runnerResult.lhr.categories.performance.score * 100);

        expect(runnerResult.lhr.categories.performance.score * 100).toBeGreaterThanOrEqual(80);
    });
});

To run it, use the following npm command.

1
npm test

It will yield the following result.

1
2
3
4
5
6
7
8
9
 PASS  test/lighthouse.ts (9.791 s)
  Load shop.polymer-project.org home page
    √ should have a page performance greater than or equal to 80 (8010 ms)

Test Suites: 1 passed, 1 total
Tests:       1 passed, 1 total
Snapshots:   0 total
Time:        9.925 s, estimated 11 s
Ran all test suites.

Awesome. My idea works, but I wouldn’t recommend using it. Too complicated, it is easier to install and run the lighthouse-cli tool, it basically does everything I just documented on this post, all you have to do is provide it with a URL.

Hope you enjoyed this post.

Credits: